Sunday, November 27, 2016

FREE Classroom Ideas for Christmas


Whether your students celebrate Christmas, Hanukkah, Kwanzaa or just the Winter Holiday off from school, as the break for the holidays approaches student attention diminishes!  

Here are a few quick ideas to use with elementary or middle school students as a warm up at the beginning of class or for that last 5-10 minutes of class to give them something to look forward to.  These require access to a computer (ideally 1:1) but can also be done with partners or on a smartphone.

Try these that final few days (or week) before the holiday break:


Monday, November 7, 2016

FREE Thanksgiving Ideas for the Classroom


Thanksgiving is just around the corner and whether students have a full week off like my district or just the two days of the holiday, they're ready for something extra fun to keep their interest.

In my classroom, students have a daily warm up that generally takes then about five minutes to complete at the start of class.  This is usually a writing prompt of some kind or a quick review question about a previous lesson.  During the holiday season though, I like to give them something fun to do on the computer instead.  If you are 1:1 computers in your classroom, of course this works great, but you can also do it with partners/teams on computers or even let students do it on their smartphones.

Here are a few fun ideas for Thanksgiving:


I hope your students enjoy these!

Saturday, August 6, 2016

212 Degree Attitude

It's that time of year again - back to school.  Some teachers have already started back; others will be starting over the next few weeks.  Regardless of what grade you teach, every teacher wants their students to do their best and be successful.  They want them to push through the challenges and come out on the other side with that "light bulb" moment where their learning makes sense and they feel that sense of achievement.


A few years ago, my principal shared a video clip with us during our professional development before school started call 212:  The Extra Degree.  I teach middle school and many of my students each year just want their work DONE - they don't care about the quality or even if they learned anything.  I started showing this video clip to them and found that a few of these "It's good enough; I'm done" students started to take another look at their work . . . and some other things too.  You might want to use it in your classroom too.  It's a great discussion starter and something you can refer back to as you have those "moments" where students aren't wanting to make an effort.


Sunday, July 31, 2016

Back to School: Using Google Forms for Digital Signatures on School Forms


It's back to school time and along with that comes all the paperwork that needs to be sent home for parent signatures.  Then, you have to collect it, determine who has brought back their signed form (and who HASN'T), send reminders, send the papers home again . . . sound familiar???  These quick steps will let you automate all that with Google Forms!

The basic concept:  You will be sending an email to parents with a link to the Google Form you create and attaching any paperwork you want them to read and sign.  Once they complete the form, Google Forms "magically" combines all the information into a spreadsheet format so you can easily see who has signed the forms and send reminder emails to those who haven't.  Easy.  Quick.  Paperless.

How to create the Google Form:

1.  Click on the Google Apps button at the top right of your screen and choose Google Forms.

2.  An untitled form will appear.  You will be using the menu bar on the right to make most of your changes.


3.  First, title your form by click on the words "Untitled Form" at the top left of your screen and typing whatever you'd like for a title (for example:  Back to School Forms for Signature).


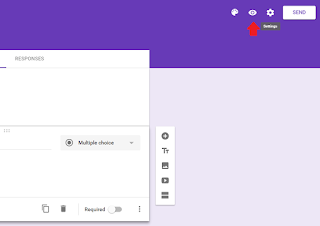
4.  Add the information you want to include (you can see my sample at the bottom of this post).  You can include paragraphs, questions, pictures, etc. using the tool bar on the right.  Be sure to choose "required" (bottom right) if you want the parent to not be able to submit the form to you without completing that question.  You can view what your form will look like as you go along by clicking the eye icon at the upper right of the screen.


5.  Change the template to make your form attractive.  You can use one of the templates offered by Google Forms, change the colors, or a picture of your own.  Click on the palette at the top right to see your choices.


6.  Google Forms offers a variety of colors and themes.  Add your own picture if you prefer at the bottom left.


7.  Your changes are automatically saved in your Google Drive (to access it, click on the arrow at the top left of the screen).  When you are finished, send your form by clicking on the SEND button at the top right.  I used the link option and copy/pasted the link provided into an email.  I then attached the forms I needed the parents to review and digitally sign to that email.


These are the samples of what I used.  The first one shows the form in editing mode and the second picture shows what the recipient sees.


I hope you find these helpful as you start the new school year!


Friday, May 27, 2016

What Worked for YOU This Year?


It's that time of year again when we are wrapping up lessons, cleaning up our rooms and preparing to say goodbye to this year's students.  Along with that, most of us are thinking about what lessons and strategies went well this year and which didn't.  The ones we'll use again next year, the ones will modify, and the ones we'll just discard and try something new.

This year, one of the units that was best received by my 8th grade Information Technology students was our unit on Adobe Photoshop.  Not all districts are as lucky as mine - we have access to the entire Adobe Suite of products for our students.  Teenagers LOVE to take pictures and the ability to edit them in different ways is naturally engaging.  Although we did have to cover appropriate use of images of others and discuss the true meaning of "school appropriate", students had a lot of fun with these lessons and learning some valuable skills they can use in high school and throughout life.

This isn't the first year I've taught Adobe Photoshop, but I did approach it a little differently this year.  We started with a basics lesson that included a step-by-step tutorial of mini lessons on the most used features of the program.  Then, they demonstrated their learning of these features in a creative project of their own.  

Feeling comfortable with the menus and features of the program, we moved forward into a short lesson about the most popular photo editing features.  Students learning how to remove red-eye, remove blemishes, etc.  Up next was a challenge where they chose from a variety of tutorials and learned how to do "something cool" like create a new animal from two different pictures.  By now they were pretty comfortable with the program and were really enjoying helping each other create the most amazing pictures.

We spent more time on Adobe Photoshop this year than we have in the past, but students really enjoyed feeling a real sense of mastery with the program!  I'll be adding a couple new "choices" to these lessons for upcoming years, but I'm glad to have invested the time in this.  Students having fun and doing something authentic keeps them engaged and learning and also gave them confidence that they could master a difficult program!


You might also enjoy:


"I Am" Silhouette Project in Adobe Photoshop

Animated GIF in Adobe Photoshop


Friday, May 20, 2016

How to Get a Jump on Next Year . . . Before Summer Even Starts!


It's the last few weeks of the year, and even though there's always lots to do, taking the time to do a few things in preparation for the first days of NEXT year will help make your summer more relaxing!  Here's a few things you can do now and can even have your current students help you with.  My students love helping get the classroom ready for next year's students and think this is fun, not work.

1.  Make copies for the first day of school.  I don't know about your school, but our copiers are always busy or broken at the beginning of the year.  If you have syllabi, parent information/permission forms, student classroom procedures, etc. that you'll be handing out the first day or two of school, consider printing those now and letting your student helpers staple and organize them.  Put them together on a shelf, in a basket or on a cart and that will be one less thing you need to do when you start getting your classroom ready in the fall.

2.  Take down posters, border, bulletin boards, etc. that you are going to change for next year.  Again, I use my student helpers for this.  If you want to get super ambitious, you can start (or even complete!) putting up decorations for next year.  Make a list of things you want for the upcoming list (new border, new letters, etc.) and add these things to your "to do" list so you can obtain these during the summer when you're shopping.  If you need a fun, colorful "to-do" list to motivate you, download this free one.

3.  Start purging things that are out of date, aren't going to be used, or are records that you'll be shredding.  Even if you need to hold on to them until the end, find an empty file cabinet drawer to tuck them into so you can just open the drawer and empty it into the trash or shredder on the last day.

4.  Reflect on what worked this year and what didn't.  You've probably done some of that throughout the year, but it's a great time to consider some of the things you wish you'd done (or wish you'd done differently!).  Add them to the list so you remember them as you're modifying lessons over the summer.

What are some of your tips for getting ahead BEFORE the new school year starts?

Graphic Credits:  Six Picks & Ashley Hughes


You Might Also be Interested in:


Classroom Expectations Template
To Do Lists (FREE)


Friday, May 13, 2016

Middle School Memories - Three End of the Year Activities

Middle School Memories
My 8th graders are entering their last three weeks in Middle School and even though most of them don't really want to admit it, they're having some conflicting emotions right now.  They're anxious (and apprehensive) about going to high school next year - leaving a school they've been at for 3 years and a place where they're now the "Big Men (or Women) on Campus" to go to a new school with new teachers and new classes.  For most, it means leaving behind some of their friends who are going to a different high school (our district has three high schools).  

Right now, it is difficult to get them to focus on school, no matter how entertaining the lesson.  They want to think back over their memories of friends and fun, and look ahead to the fall when they'll be enjoying new experiences.  So, I came up with a few lessons that let them learn some new skills AND get a chance to reflect back or look ahead.


Idea #1: “I’ll Always Remember” project in PowerPoint. Students combine pictures with a short paragraph about a specific memory they will “always remember” from each of their classes in a PowerPoint presentation and then share these.  Get the full lesson.

Idea #2: Memories from the Year video project gives students an opportunity to share their memories from the school year as a culminating activity to the year. It uses the Web 2.0 tool, WeVideo, which is convenient for teachers and students since it does not require download. Students use existing pictures and videos or shoot additional ones and then combine those with WeVideo’s built in music to create a video retrospective of the year. Get the full lesson.

Idea #3: Showcasing the Year’s Best Work in an Online Weebly Portfolio utilizes the free Web 2.0 tool www.weebly.com to create an online portfolio/web site. No download is required to use the product, making it easy for teachers who are not able to download software on classroom computers to still give their students a choice in learning.  Students enjoy looking back at all their accomplishments for the year and seeing how their work has improved too! Get the full lesson.

Sunday, May 8, 2016

5 Ideas to Help You (and your Students!) Survive the End of the Year


Most teachers are entering those final weeks of the year.  For some of us (like me!) that means we still have standardized testing to get through.  But, more importantly, we want the last few weeks of the year to be as memorable and filled with meaningful learning as the first weeks of the year.  That's not always so easy!

My middle schoolers are DONE with school.  I teach 8th graders so they are done with MIDDLE SCHOOL all together.  They are focused on what high school will be like, what classes they'll be taking, which of their friends will attend their high school, etc. even more than planning for summer.  Like every year, some are done working.  They're letting their 90+ grade drop into the 70's as they just.don't.care.anymore.

This may be okay with them (and sadly, even with many of their parents), but it's NOT so okay with me.  A break from learning, sure.  A total "stop" . . . uh, NO.  So, it becomes my job to find something they still want to do that takes them to the next level of learning.  Since 8th graders are pretty savvy about "real work" and what actually interests them, this is a challenge every single year.

Does this describe your classroom too?  Here a few ideas that I've tried successfully over the years:

1.  Let them choose their project.  You know what they still need to learn, but HOW they learn it could be up to them.  Authentic learning is always great and if they feel like they have more control, they're going to be more motivated and take more ownership of the project.  Let them choose whether to do a poster, create a website, use a collage, etc.  You can set up what they need to demonstrate in their learning and then let them choose the "how" of the project.

2.  Have a competition.  Get other students who AREN'T in your class to judge.  We did this for a robotics competition and used 7th graders to judge.  My students wanted to impress these kids, so they really pulled together and worked hard.  You can use competitions for review too - think Jeopardy-style quiz games or free sites like Kahoot to get kids re-excited about learning.  Note:  be prepared for it to get a little loud!

3.  Figure out what they're wasting time on and make it a lesson.  Everyone wants to play computer games?  How about learning how to create one with a free site like Gamestar Mechanic or Sploder?  Neither of these require download and are great for all ages.  We like combining this with a competition where students rate each others' game and give constructive feedback for improvement.

4.  Try something that might be just a little too hard (aka challenging) for them.  My 8th graders have taken on some tough stuff:  AutoCAD, Adobe Photoshop, etc. and done really, really well with it.  I let them work together and help each other, provide them with tutorial links and videos and let them see what they can do without the "stress" of a grade for specifics.  I grade them instead on being on task, working collaboratively, using their resources and trying their best.

5.  Recognize that there are going to be days where no one (including you) wants to work.  The weather is nice, summer is almost here, and they've worked hard all year.  Let them work with a partner, work in a team, use their phone to research information, or just take a "brain break".  Take them outside, plan an activity where they can move around, give them some fun options if they finish early . . . in other words, use that same creativity that has made your year fun and awesome to get you and THEM through these last few weeks.

Who has other ideas to share?

Monday, January 11, 2016

Design & Build Your Own City

One of the big projects I do each year with my 8th grade engineering students is to have them design and create their own city.  We start out this unit by talking about city planning, using the city they live in as an example.  We look at some of the design and planning maps and I have some of the city planners come and talk with students to explain what goes in to designing a city.

Our next step it to have the kids choose their team (3-4) and start researching information about city design to build on the knowledge they gained from our speakers.  Each group chooses a city zone to build and designs their city to scale using SketchUp (a free, online CAD program).  They plan with their group regarding what buildings should go in the zone and then determine how they will divide the work to accomplish their goal.  We work with Engneering notebooks for planning along with guide sheets to help them and work logs to keep them all on track.


Once the designs are completed, each team actually builds their zone, utilizing chipboard and a variety of other materials to create their city zone to scale.  I provide materials in the classroom, but sometimes students want something specific that i don't have and I allow them to bring that (if they clear it with me first of course!).

This portion of the project takes us several weeks.  Once all the buildings and decorations have been completed, we work together as a class to combine the buildings to create the end result of a city.  We leave it set up for a few days so that other teachers and students can "visit" the city and admire the hard work!


If you'd like the entire lesson, planning sheets, work logs and student handouts, it is available to download here.


Wednesday, January 6, 2016

Designing Skyscrapers

Tall buildings and modern designs are fascinating aspects of architecture and engineering, so it is no surprise that students love the idea of learning more about these as they take the role of a designer.  Studying existing buildings, learning about how they are designed to withstand natural disasters while still being aesthetically pleasing, is our starting point for the unit.  As a part of this, students choose a skyscraper of interest to research and then replicate its design using Sketchup (CAD), a free download, to create a scale model.


Empire State Building
Our next lesson lets them use what they've learned to design their own skyscraper, again to scale in Sketchup.  I love seeing the creative ideas they have!


Finally, using a budget and a limited amount of time (just like real engineers!), teams construct a skyscraper together.  The finished product needed to be to scale, and able to withstand both wind and earthquake!


If you'd like to use this lesson with your class, you can obtain the full lesson plan here.


Saturday, January 2, 2016

Helping Students Set Goals for the New Semester

For most schools, when students return in January they are not only starting a new year - they are starting a new semester.  This is a chance for them to make some changes in their approach to learning and studying and a great time to talk about goal setting as a part of the first lessons.

"New Year's Resolutions" usually aren't really goals - they are more like "wishes".  Real goals need to be SMART - an acronym for Specific, Measurable, Attainable, Relevant and Timely.  Students may have heard of this concept before, or it may be brand new.  

This lesson is great for all ages.  In my 8th grade classroom, I use a combination of small group and individual work with this lesson.  Since my students are at an age where they love to share with their peers, this gives them a chance to discuss what is important to them and get feedback from those they value most (each other!).  

First, we go through the SMART goals as a class:  what they are and why they are different than "hopeful wishes".  Then, they choose a group to work with, grab a piece of chart paper and some colored markers for the group, and start brainstorming.  For this age, letting them choose who they feel comfortable sharing with has worked best for me, but you can use other methods for choosing groups (or partners) too.  I never let them work in a group larger than 4.  In their group, they will brainstorm on goals they might have for things they want to improve, new things they want to try, and things that would help others and enter those on the chart paper.  I time this activity (5-7 minutes) using a free online timer on my SMARTBoard and then have them tape their charts to the wall and we all do a "gallery walk" to see the ideas.


Now it's time for them to work individually on the next part - creating their own personal list of possible goals for the upcoming semester.  I use two different worksheets to guide them through this, to help make their ultimate goal truly SMART!

We revisit this periodically throughout the semester to make sure they are on track to attaining their goal, or revising it if necessary.  If you'd like the full lesson with all the worksheets, printables, and resources, it is available here.